
Welcome to this step-by-step guide on artificial turf installation. Whether you are enhancing a residential landscape, creating a pet-friendly yard, or upgrading a commercial outdoor space, the right installation process helps your turf look better, drain properly, and last longer.
Before you begin, make sure you have the right base material, edging, seam tape, adhesive, infill if needed, a utility knife, a compactor, and basic safety gear. A careful setup at the beginning prevents wrinkles, drainage issues, and uneven spots later.
Step 1: Prepare the Surface
Before starting your installation, thoroughly clean and clear the area of debris, rocks, roots, old grass, or vegetation. Ensure the ground is level and free from dips or bumps. Use a rake or shovel to even out the surface, and consider using a level to confirm uniformity.
Precaution: Check for underground utilities, irrigation lines, or sprinkler systems before digging. If you have existing weeds, remove them and consider using a weed barrier or geotextile fabric as part of the base preparation.

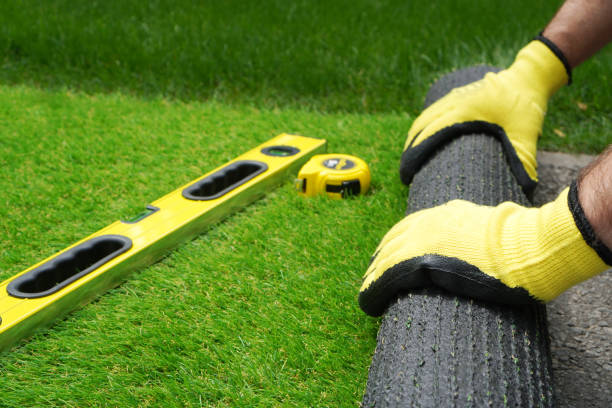
Step 2: Lay the Base Material
Spread a layer of crushed rock or decomposed granite evenly over the prepared surface. Aim for a depth of about 2–3 inches for many residential applications, or more if the area needs extra drainage or stability. Compact the base material using a plate compactor, working in small sections to achieve a firm, level foundation.
Precaution: Avoid over-compacting or creating low spots. Poor base preparation can lead to drainage problems, wrinkles, or uneven areas in the finished turf.

Step 3: Install Edging
Place sturdy edging along the perimeter of the installation area to define the edges and prevent turf movement. Secure the edging with stakes or screws, ensuring it sits flush with the ground. Leave a small gap where needed so water can drain instead of getting trapped.
Precaution: Make sure the edging is securely fastened to prevent shifting or separation over time. Loose edging can cause the turf to lift or curl.

Step 4: Roll Out the Turf
Carefully unroll the artificial turf across the prepared surface, positioning it to align with the edges and corners. Let the turf relax before trimming if it has been tightly rolled. Avoid dragging it across rough surfaces because that can damage the backing or fibers.
Trim any excess turf with a sharp utility knife, making clean cuts along the edges. Keep the blade direction consistent across all pieces so the finished surface looks natural.
Precaution: Handle the turf with care to avoid tearing, stretching, or cutting too much material at once.

Step 5: Seam and Secure
If your installation requires multiple turf pieces, use seam tape and adhesive to join them together. Apply the adhesive evenly along the seam and press the edges firmly together. Make sure the blades from both pieces face the same direction so the seam blends naturally.
Secure the turf in place by nailing or stapling it to the base material every 6–8 inches along the edges and seams. Keep fasteners low enough to hold the turf but avoid crushing the fibers.
Precaution: Use caution when applying adhesive to avoid spills or drips. Poor seam alignment can make the finished lawn look uneven.

Step 6: Add Infill (Optional)
For added stability and a more natural look, consider adding infill material to the turf. Spread the infill evenly over the surface and use a power broom or stiff-bristled brush to work it into the turf fibers. This helps support the blades and can improve drainage and surface stability.
Precaution: Avoid overfilling the turf with infill. Too much infill can affect drainage and make the surface feel uneven.

Step 7: Brush and Fluff
Once the installation is complete, use a stiff-bristled brush to fluff up the turf fibers and create a more uniform appearance. Brush against the grain to encourage the fibers to stand upright and create a natural look.
Precaution: Use gentle brushing motions to avoid damaging the turf fibers. Inspect the entire installation for loose edges, raised seams, wrinkles, or areas that may need reinforcement.

After Installation: Water, Check, and Maintain
After installation, rinse the artificial grass to help settle infill and remove dust from the surface. Check that water drains properly and does not pool in low spots. If you notice standing water, adjust the base or drainage before regular use.
For ongoing maintenance, remove leaves and debris, rinse pet areas when needed, and brush high-traffic spots to keep the fibers upright. These small steps can help your artificial turf stay cleaner and last longer.
Final Thoughts
By following these step-by-step instructions and taking the right precautions, you can achieve a cleaner, more professional artificial turf installation. Careful surface prep, a compacted base, secure seams, proper infill, and regular brushing all help create a low-maintenance landscape that looks good for years.
Share:
Essential Insights for Installing Artificial Turf
Unveiling the Evolution of Artificial Grass: A Journey Through History