Installing artificial grass on pavers or bricks is a practical way to refresh a patio, walkway, balcony, side yard, or pet-friendly outdoor space without removing the hard surface underneath. With the right preparation, drainage plan, adhesive, edging, and turf choice, you can turn a dated brick or paver area into a softer, greener, low-maintenance surface.
The key is to treat the existing pavers or bricks as the foundation. They need to be clean, stable, level, and able to drain before you install the turf. If the surface is uneven, loose, mossy, or holding water, fix those issues first so the finished artificial grass looks smooth and performs well over time.
If you are still choosing turf for the project, start with durable artificial grass that fits your space, traffic level, and use case. For installation supplies like turf tape, staples, adhesive, or other setup tools, check the Grass Accessories collection.
Can You Install Artificial Grass on Pavers or Bricks?
Yes, artificial grass can usually be installed over pavers, bricks, flagstones, concrete, and similar hard surfaces as long as the area is secure and drains properly. You do not always need to remove the existing surface before installing turf.
This can make the project easier and less expensive than a full demolition. It is especially useful for patios, walkways, courtyards, balconies, and small outdoor areas where natural grass would be hard to grow or maintain.
However, you should not install artificial grass directly over loose, broken, unstable, or heavily uneven pavers. Those problems can show through the turf, create tripping spots, or cause the grass to wear unevenly.
Best Places to Use Turf Over Pavers and Bricks
Artificial grass over pavers or bricks works well in many outdoor areas, including:
- Patios that feel too hard or plain
- Walkways that need a softer, greener look
- Poolside areas that need a cleaner surface
- Balconies and rooftop spaces
- Side yards with old brick or concrete
- Pet potty areas or dog-friendly patios
- Outdoor lounge spaces
- Small yards where natural grass struggles
For pet owners, turf over pavers can be especially helpful because it creates a cleaner surface for dogs while still using the hard surface underneath as a stable base.
Step 1: Inspect the Existing Pavers or Bricks
Before installing anything, inspect the surface carefully. Look for loose bricks, cracked pavers, sunken areas, sharp edges, large gaps, or sections where water collects.
Fix these issues before moving forward:
- Reset loose pavers or bricks
- Replace broken pieces
- Fill wide gaps with sand, mortar, or a suitable leveling material
- Smooth sharp edges that may damage the turf backing
- Correct low spots that collect water
- Check that the surface slopes away from the house or structure
The better the base, the better the final turf will look. Artificial grass can hide some visual imperfections, but it should not be used to cover serious surface problems.
Step 2: Clean the Surface Thoroughly
Artificial grass should be installed on a clean, dry surface. Dirt, moss, weeds, old leaves, oil, and loose debris can interfere with adhesion and drainage.
Before installation:
- Sweep the area thoroughly
- Remove leaves, stones, gravel, and loose material
- Pull weeds from joints and edges
- Treat moss or weeds if needed
- Pressure wash the surface if it is dirty
- Let the surface dry completely before installing turf
Do not rush this step. Adhesive, tape, and turf backing perform better when the surface is clean and dry.
Step 3: Check Drainage Before Installing Turf
Drainage matters any time you install artificial grass, but it is especially important over hard surfaces like pavers and bricks. Water needs a clear path to move away instead of sitting between the turf and the base.
After cleaning the area, spray it with water and watch where the water goes. If it drains quickly, the surface may be ready. If water sits in low spots, those areas should be corrected before installation.
Common drainage fixes include:
- Adding a slight slope where possible
- Filling sunken gaps between pavers
- Using a drainage mat under the turf
- Creating channels where water can escape
- Avoiding full adhesive coverage that blocks water flow
For a deeper explanation of drainage layers and base materials, see PetGrows’ guide on what to put under artificial grass for drainage.
Step 4: Decide Whether You Need a Weed Barrier or Drainage Mat
On pavers or bricks, a weed barrier may be useful if weeds grow between joints. It can help reduce weed growth and create a cleaner separation layer below the turf.
A drainage mat may be useful if the area is used by pets, gets regular rain, or sits on a patio or balcony where water needs help moving away. Drainage mats can also add slight cushioning and create space for water to move under the turf.
For dog areas, drainage is one of the most important parts of the setup because urine and rinse water need somewhere to go. If the surface does not drain, odor can build up even when the turf itself is easy to clean.
Step 5: Measure and Plan the Turf Layout
Measure the full area before ordering turf. Include corners, curves, steps, and any obstacles such as posts, drains, planters, or edging.
When planning the layout:
- Measure length and width carefully
- Order slightly more turf than the exact area to allow for trimming
- Plan the pile direction so all pieces face the same way
- Try to reduce visible seams in high-traffic areas
- Think about where water will drain after installation
If you are covering a long walkway or patio, consistent pile direction is important. If two turf pieces face different directions, the color and texture may look mismatched.
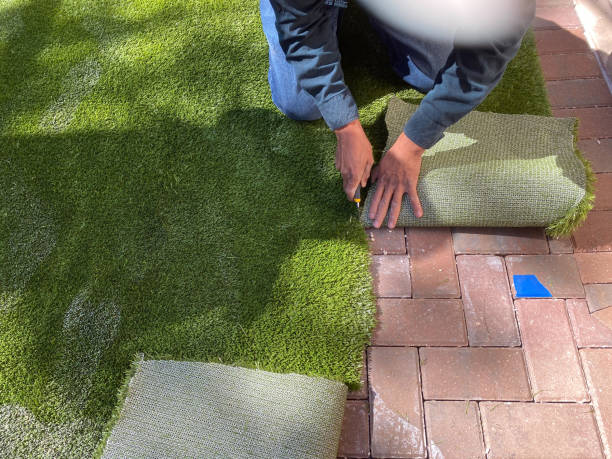
Step 6: Roll Out the Artificial Grass
Roll the artificial grass over the prepared paver or brick surface. Let it sit for a few hours if possible. This helps relax creases and makes trimming easier.
Position the turf so it covers the full area with a small amount of extra material around the edges. The extra material gives you room to make clean cuts.
Before cutting, check:
- The turf direction
- The fit around edges
- Any seams between pieces
- Drainage points
- Door clearance if the turf is near an entry
Step 7: Trim the Turf to Fit
Use a sharp utility knife to trim the turf from the backing side. Take your time around edges, curves, pavers, posts, and steps.
For the cleanest result:
- Use a sharp blade
- Cut slowly from the backing side
- Avoid cutting too much at once
- Leave a small overhang first, then trim again if needed
- Keep seams straight and tight
If multiple turf pieces are needed, line them up carefully before securing them. The grass blades should face the same direction and the seam should look natural.
Step 8: Join Seams if Needed
If your project requires more than one piece of turf, use joining tape and turf adhesive to secure the seam. Do not overlap the turf pieces. They should meet edge to edge.
To make seams less noticeable:
- Keep the pile direction consistent
- Trim edges cleanly
- Use proper seam tape
- Press the seam firmly after applying adhesive
- Brush the fibers after the adhesive cures
Good seam work can make the installation look much more professional, especially on patios and walkways where people view the surface up close.
Step 9: Secure the Edges
Artificial grass over pavers or bricks can be secured with turf adhesive, outdoor tape, perimeter edging, or fasteners depending on the surface and project type.
For hard surfaces, adhesive is often used around the perimeter and at seams. Avoid covering the entire underside with adhesive if the surface needs drainage. Full adhesive coverage can trap water under the turf.
In some cases, edges can be tucked into a perimeter trench or held down with edging. Around patios and walkways, clean edge work keeps the turf from lifting or shifting.
Step 10: Add Infill if the Turf Requires It
Some artificial grass products perform best with infill. Infill helps support the blades, adds weight, and can improve the feel of the surface.
For paver or brick installations, infill may help the turf lie flatter and reduce wrinkles. For pet areas, choose infill carefully because drainage, odor control, and cleaning matter.
Common options include:
- Silica sand for stability
- Pet-friendly infill for dog areas
- Cooling infill for sunny spaces
- Low-odor options for potty areas
Brush the infill into the turf with a stiff broom so it settles between the blades.
Step 11: Brush and Finish the Surface
After the turf is trimmed, joined, secured, and infilled, brush the grass fibers upright. Brushing helps the turf look fuller and more natural.
Check the whole area for:
- Loose edges
- Visible seams
- Wrinkles or creases
- Poor drainage spots
- Uneven infill
- Areas where the turf needs more trimming
A final rinse can also help remove dust and show whether water drains properly.
Special Tips for Pet Areas on Pavers or Bricks
If you are installing artificial grass for dogs over pavers or bricks, plan for drainage and cleaning from the start. Dogs may use the area daily, so urine needs to pass through the turf and away from the surface.
For a better pet setup:
- Choose pet-friendly artificial grass with drainage holes
- Use a drainage mat if water has limited escape routes
- Rinse the area regularly
- Use pet-safe turf cleaners when needed
- Avoid trapping urine between the turf and hard surface
- Keep solid waste picked up promptly
For more dog-focused turf guidance, read PetGrows’ guide on what pet turf is and how it works.
Maintenance After Installation
Artificial grass on pavers or bricks is low-maintenance, but it still needs basic care to stay clean and attractive.
- Brush high-traffic areas to keep the blades upright
- Remove leaves and debris before they break down
- Rinse dust, pollen, and pet areas with water
- Check seams and edges every few months
- Refresh infill if it becomes uneven
- Watch for drainage problems after heavy rain
Regular care helps the turf last longer and keeps the surface more comfortable for people and pets.
Final Thoughts
Installing artificial grass on pavers or bricks is a smart way to upgrade a hard outdoor surface without tearing it out. The best results come from careful preparation: clean the surface, fix uneven spots, plan drainage, choose the right turf, trim carefully, secure the edges, and brush the finished surface.
Whether you are refreshing a patio, creating a pet-friendly balcony, covering an old brick walkway, or adding comfort around an outdoor lounge area, PetGrows can help you choose turf and accessories that match the space.
Explore the PetGrows site for artificial grass, installation accessories, and practical turf guides to plan your project with confidence.
Share:
Why You Shouldn't Purchase Artificial Turf From Big Box Discount Stores?
The benefits of artificial turf for allergy sufferers